Welcome to the Affinity Bracelet Weave-along Part 1. In this lesson we will start and finish an Affinity Bracelet. Because there are so many possibilities for the Affinity bracelets, we’ve decided to weave more than one. The first bracelet will be woven on a hand-painted silk warp (or if you have not purchased the silk warp or the kit, you can use other embroidery silk or cotton for the warp . . . just make sure it’s not too thick while also being strong enough to withstand a good amount of loom tension). For weft, we will be using hand-painted silk (or whatever you are using as a substitute) and size 8/0 seed beads. The next Affinity bracelet will be woven entirely from gold thread and size 11/0 seed beads. And if you are willing, we might just throw in a third bracelet possibly made just from a variety of beads. We have some ideas!
So let’s begin with our first Affinity bracelet. This is so much fun to weave and even to finish!
We have used to colors of hand-painted silk. Each “color” actually contains about four or five colors, so this is going to turn out to be a rather rain-bowish piece because we will be using the same silk for he weft. We have put a total of eight warps on the loom, which means the rows that contain 8/0 seed beads will contain seven beads. Note that there is no need to use a spring because the first row of beads will create the warp sett and will continue to keep the sett correct as you add beads. Plus we’ve found that even if you don’t add a lot of beads, the selvedges tend to stay straight as long as one is careful to not tug too hard when bringing the silk weft through the shed.
Our bracelet weaving is going to be 4 1/2 inches long. The silk ends and clasp take up quite a lot of space. You want the weaving part to curve around your wrist leaving a couple of inches of space on the back. The great thing is you don’t have to be exact about this. If your piece is a little too short, it will still look fabulous. The silk warp ends are beautiful too.
 |
| Warped 8″ loom ready to go. You want to leave a lot of extra warp on either side of the piece. We suggest about six to seven inches. This warp will become part of the piece and will not be “loom waste”. |
 |
| Close up of all those gorgeous silk colors. |
 |
| Tie your bead thread to the side bar with a slip knot. |
 |
| Pick up seven 8/0 seed beads and place behind and in between the warp threads. |
 |
| Sew back through the beads but behind the warp, thereby attaching the beads to the warp. |
 |
| Pull tightly so that the beads are snug against one another. |
 |
| After adding a few rows of beads, thread the other end of the bead thread that was attached to the side bar and sew it half way through the bottom row of beads, knot around a warp thread, and sew through the beads to the end of the row. Trim end. |
 |
| Begin a row of silk weft by threading your tapestry needle with the silk and weaving under the first warp, over the second warp, etc. until you’ve reached the end. |
 |
| When you weave back going under the threads you went over and over the threads you went under, remember to catch your bead thread inside your silk weft so that it will travel up the piece until you use it again. |
 |
| Just like you caught your bead thread, you also want to catch the tail of your silk weft. You will do this for a few rows and then later trim that piece. This method gives you a two sided piece, which is necessary to make your Affinity bracelet look finished without stray ends hanging out on the back. |
 |
| A few rows into weaving our silk weft. |
 |
| Another visual of how to catch that bead thread! |
 |
| The yarn just sings with nice color changes! |
 |
| Trimming the weft end. Amazing how I was able to hold a camera and do this at the same time! |
 |
| Add another row of beads, this time catching your weft in the bead thread to allow it to travel up the side of the piece until you are ready to use it again. |
 |
| Back to the silk using all the same techniques of burying the thread we have mentioned. |
 |
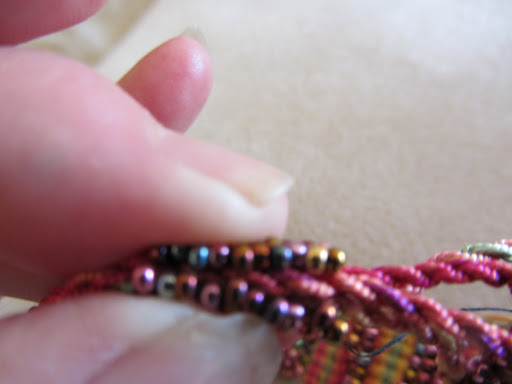
| A nice visual of catching the bead thread. Look how neat the edges look. |
 |
| Here we start a new silk weft thread the same way we started the last one. |
 |
| Again employing the method of catching the weft tail and the bead thread to allow them to travel up the side of the piece. |
 |
| Because we’ve used the second color of variegated silk, it looks like we’ve added a whole bunch of new colors. |
 |
| Adding back the original silk weft color. |
 |
| Almost there . . . our piece is going to be 4 1/2 inches long. |
 |
| Our last row of beads. Sew part way through the row below, tie a knot around a warp thread and continue sewing through the beads. |
 |
| Tying a knot around the warp thread. |
Release tension on the loom and slip out the warping bar. Trim the very ends of your warp so that you’ve cut the loops enabling your to tie knots in thread pairs.
 |
| Trimmed warp ends. |
 |
| Our piece resting off the loom. |
 |
| Weight one end of your piece so you can tie knots on the other end. |
 |
| Tie the beginning of a square knot. |
 |
| Snug the knot close to your piece. |
 |
| Tie an overhand knot. Stick your tapestry needle in the knot and push the knot toward the base of our piece. |
 |
| Once the knot is in the correct place, remove your tapestry needle. |
 |
| An overhand knot in exactly the right place! |
 |
| A bunch of (fuzzy) knots. |
 |
| All the knots tied. |
 |
| Weight one end of your piece. Take two pairs of paired warp ends and twist in the direction of the yarn causing them to over twist. |
 |
| Then allow the yarns to twist back on themselves forming a rope. |
 |
| Tie a knot leaving at least five inches between your knot and the base of the weaving. |
 |
| Second two ties turned into ropes. |
 |
| You can use a simple knot to attach your piece to your wrist or you can make a peyote tube out of seed beads and use that as a closure. |
 |
| Beginning a flat piece of even count peyote: string ten 11/0 seed beads. |
 |
| Pick up a bead and sew the second strung bead. Pick up a second bead and sew through the fourth bead, etc. until you’ve reached the end. |
 |
| Keep doing this until you have a piece that snugly wraps around the silk ropes (photo of this a little later on). In this photo we’ve taken the tail end and sewed it back into the piece, forming a knot and continuing to sew into the beads. |
 |
| Knotting the tail. |
 |
| In order to be able to “zip” your piece you will need the two sides to be staggered. |
For really clear instructions on how to do peyote stitch, we recommend you visit the beadworkabout.com http://beadwork.about.com/od/beadingstitchtutorials/ss/flat_even_count_peyote.htm
 |
| Wrap your piece around the four ties to see if it will be snug enough. To do this, cross the two sets of ties. The peyote tube will hold them together, letting the ties slide open to put on your wrist and then tighten to keep it on our wrist. You want this tube to be as small as possible so that it puts pressure on the ties and doesn’t allow the bracelet to slip off your wrist. |
 |
| Just the right size and ready to tie on. You can use the same number of rows as above if you’ve used the Mirrix silk warp. |
 |
| Wrap the tube around the ties and start zipping it together. Be careful not to catch any of the threads from the ties because they need to move freely underneath the tube. |
 |
| Our finished tube! |
 |
| Notice how one of the warp ends is too short. Well, last night the piece was left on a desk and Maia the cat thought it would make a great chew toy. She chewed off one of the ends. This bracelet is a keeper because we can’t give it away now! |
There she is: ready to wear and love.


I started my Affinity bracelet this morning, and now I have to go to work! I don't think work is going to have my full attention, because I'm already planning more Affinity bracelets in my mind!!! They are SO fun, so I just ordered some of your beautiful mulberry silk thread! Thanks, Claudia and Elena.
Sandy- Glad you're enjoying weaving the Affinity Bracelet. I love how everyone can take the concept and make it their own! We'd love to see pictures when you finish your first one!
Elena